
Office Desk Build (Final)
In Part 2 of the Office Desk build, I covered the joinery process for the base, which was all mortise and tenons. In the final part, we sort of put a lid on this project by putting the top on and going through the finish.
Top Construction
The tops finish thickness will be 3/4" so I started with 4/4 rough cherry and milled it down. As you may recall in the Part 1 post, I had already laid out what pieces the top would come from. I do find though, that you really don't make that final decision on which pieces go where until you've run the pieces through the jointer and planer and see the true grain patterns.
The milling process is pretty standard stuff; start with the jointer, get one face flat, then use that face against the jointer fence to get one edge straight and square to the face. Then, over to the planer to get the pieces to their final thickness. Once that is all done, I lay the pieces back out to get the best "show faces" and grain patterns that are most appealing to me.
This pattern was the one I liked the best, so once I have it the way I like it, I put a witness pattern across the pieces so I know which board goes where during the glueing process. Once the glue-up is done, I use my
to get rid of mill marks and any glue residue on the top.

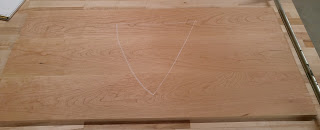
Shaping the Top
While thinking through the design of this desk, I really didn't want to just have a plane square top. I wanted the top to be a little different, a bit more inviting and have a nice look to it. What I came up with was to make the front edge have a concave curve to it. I felt that, this way, you could really get your chair up close to the desk, and have a natural place for your arms to rest nicely. Here is that edge:

Once I formed this edge (on the bandsaw by the way), I used my
to create a rounded under bevel on the bottom edge of this curve, which you will see in the finished pictures below. I thought this would be a nice details and trick of the eye and, honestly, I was just playing around with ideas at this point and, since the piece is for me, I can do that.
Finish and Finished Product
The finish on this piece follows the principles I try to usually follow, keep it simple and natural looking. So, for this piece I opted for a Tung oil finish, about 3 coats then a wipe-on polyurethane over that (after letting the oil set for a couple weeks to fully cure). The wipe-on is an oil based, cut 50/50 on the first two coats then about 75/25 on the last two coats. Very light sanding in between coats to remove dust and nibs. I then used 00 steel wool with some furniture wax to rub it out and then buff it to a nice smooth finish.
Here are a couple photos of the finished product, the first one shows that under bevel on the front edge of the top.

Finished product:

Lessons Learned - What's Next?
As with anything, I like to learn something from a project, whether it is a technique or design element. On this project, I hand chopped my first mortises, which was fun, but a lot of work. I don't think I could have reliably done it with a machine so I was "forced" to learn this method. Second, if I re-think the design, I think I would curve the front apron on the base to look similar to the curve on the top; I think that would have been a nice design element and made the desk even more inviting; maybe next time.
My next project is going to be an outdoor dining table for a friend of mine who recently bought a house. This table will be made from white oak, which is very reliable for outdoor furniture. Check back in, or subscribe to the blog to get updates on this beast of a table!